Tenda has a special series, called N300 of range extenders, that are optima to extend the existing wifi signals and eliminate dead zones. Moreover, the Tenda N300 is a perfect choice to boost the existing wifi signals and optimize the networking. If you have recently purchased this networking gateway, then, you must know How To Setup Tenda N300 WiFi Extender in quick steps. Additionally, this guide provides different ways to set up and extend the wifi signals easily at home. For more insights, walk through this blog post!
Prerequisites For the Tenda N300 Setup
When you are heading with the Tenda WiFi Extender N300 Setup, you must collect the required things. These important things are essential to carry out the range extender setup seamlessly. Here are the key requirements for this process:
- A Tenda N300 extender unit
- Existing wifi extender
- A stable internet connection
- Correct web/IP address
- Valid administrative details
- Computer
- Ethernet cables, etc.
Apart from these credentials, it must have a sufficient power supply and an original power adapter for device connections. Additionally, you must know the correct procedure to set up your range extender seamlessly. To know the detailed process of extender, stay tuned further!
How To Setup Tenda N300 WiFi Extender Step-by-Step?
Now, you are all set to perform the Tenda WiFi Extender N300 Setup with all the required things. Moreover, there are two available ways to set up your Tenda extender, i.e., via web GUI and WPS button. Both methods have simple and easy-to-follow steps. If you want to learn How To Setup Tenda N300 WiFi Extender, here are the stepwise instructions.
Web GUI Method For the Tenda N300 Setup
- First, plug your range extender in the same room as the router.
- After that, connect your computer to the extender’s default SSID.

- Now, open any web browser and enter the re.tenda.cn or 192.168.0.254 in the address bar.
- After that, log into your admin account using valid login credentials.
- Then, you reach the setup wizard of the extender.
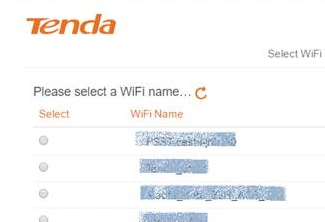
- Further, choose an existing wifi network to extend.
- Enter the wifi password for the chosen wifi SSID and tap ‘Done’.
- Further, go to the Internet Settings in the ‘Repeater Mode’.
- Now, tap on the extender’s SSID and visit the WiFi Settings page.
- Hereon, modify the wifi SSID and password accordingly and tap ‘Save’.
- For further configuration, follow the on-screen instructions.
- Ultimately, you have learned How To Setup Tenda N300 WiFi Extender.
How To Setup Tenda N300 WiFi Extender Via WPS Button?
- Initially, plug your range extender into a power source near the wifi router.
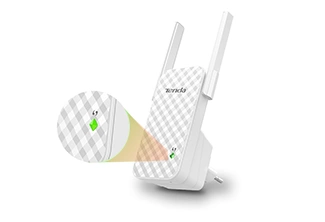
- Wait till the power LED turns on.
- Further, locate the WPS button on your range extender and existing router.
- Now, press the WPS button on the wireless router.
- Then, press this button on your range booster within 2 minutes.
- Wait till the LED indicator on the range extender shows a solid blue color.
- With this, your N300 range extender extends the existing wifi signals successfully.
- Finally, the Tenda WiFi Extender N300 Setup is finished.
Bottom Line
At last, this brief blog post sheds light on the complete process of How To Setup Tenda N300 WiFi Extender within minutes at home. Additionally, you knew two ways to extend the Tenda mini N300 range extender. Hopefully, you are enjoying uninterrupted internet access at every corner of your house.