A reliable and high-speed internet is one of the basic requirements in today’s world. To fulfill your daily home networking requirements, you must set the advanced networking devices such as routers or range extenders. Similarly, the Tenda WiFi 6 Extender Setup is an efficient way to meet your personal and professional networking needs and enables multiple device connections simultaneously via its MU-MIMO technology.
If you newly own the Tenda range extender and want to make the most out of it, then, performing its setup is essential. Similarly, this guide highlights the stepwise instructions to perform the initial and advanced configuration on the Tenda WiFi 6 Repeater in a simplified manner. For more insights, read the complete blog!
Different Ways to Perform the Tenda WiFi 6 Extender Setup
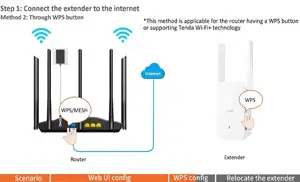
Most importantly, you can set up the wifi range extender in two ways, i.e., via the web-based interface and the WPS button. The web GUI is the most preferred way to configure your networking devices.
Simultaneously, the WPS physical method allows the users to set up their extenders seamlessly. If you are interested in learning How to Setup Tenda WiFi 6 Extender in different ways, stay in this section.
Configuring the Tenda WiFi 6 Repeater in Extender Mode
- First of all, connect your computer/smartphone to the extender’s default wifi network.
- Then, tap ‘Start Now’, when the web GUI of the Tenda extender appears automatically.
- If you are unable to access the web GUI, then enter the re.tenda.cn in the URL bar.
- After that, set the Login password and tap Next.
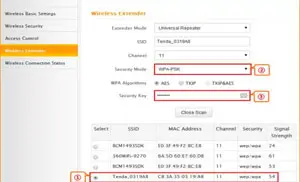
- Now, choose a wifi network that you want to extend and enter the valid password.
- Further, tap ‘OK’ and customize the wifi name and password as per your preferences.
- You can also set the extender password the same as the superior wifi password.
- Now, read the on-screen instructions and tap ‘Extend’.
- Wait till the wifi connection is made.
- Finally, the Tenda WiFi 6 Extender Setup is finished.
How to Setup Tenda WiFi 6 Extender Via the WPS Button
- Initially, make sure your wifi router is supporting the Tenda mesh wifi technology.
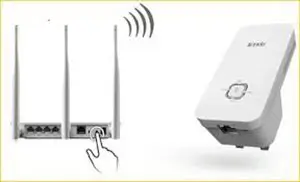
- Then, locate the WPS button on your router and extender.
- Now, press and hold the WPS button with a paperclip on the router.
- Within 2 minutes, press the WPS button on the Tenda WiFi 6 Repeater.
- Hereon, wait till the LED indicator on the range extender blinks green.
- Release the button when the LED gets stable and turns solid green.
- At last, the WPS setup for the Tenda range extender is finished.
Final Words
On the whole, this was all about the Tenda WiFi 6 Extender Setup procedure. However, we have walked you through the two different ways to extend the existing wifi signals and set up your range extender optimally. Hopefully, you are now enjoying the extended wifi network and extended wifi coverage at home.